Creating Forms |
Use the class os_form
to create a form. An os_form object takes two
arguments.
get or post
. The default is post . Refer to the Web
Reference Manual for details on both methods. For example, the following
creates the os_form object form
that sends the contents of the form to the e-mail address webtest@recursionsw.com.
os_form
form( "mailto:webtest@recursionsw.com" );
Forms can contain a variety of elements including several types of input and selection elements. Following is a list of input and selection elements that can be included on the form.
os_input_text |
A text entry field for a single line of text. |
os_input_password |
An entry field for a single line of text. Characters typed into a password field are not encrypted but are echoed on the monitor as asterisks (*) when they are typed. |
os_textarea |
A text entry field for multiple lines of text. |
os_input_radio |
A selection element that declares the possible responses for a selection field when you want to restrict selection to a single choice. |
os_radio_group |
An object that defines a group of radio buttons. |
os_input_checkbox |
A selection element that declares the possible responses for a selection field when you want to permit selection of multiple choices. |
os_checkbox_group |
An object that defines a group of checkboxes. |
os_input_hidden |
A text field where no field is seen on the form, but the field content is sent when the form is submitted. This field is useful for transmitting internal information and is typically used for maintaining state between separate CGI program invocations. |
os_select |
A pulldown list of choices. The response is restricted to a single choice by default. |
os_input_reset |
Resets the form fields to their initial values. |
os_input_submit |
Transmits the contents of the form. |
Each input and selection element is identified by a name, which is usually the first argument of the constructor. When transmitting information from a form, the value(s) of the object is paired with the name of the object resulting in one or more name/value pairs.
The following sections describe how to add each of the elements included in the previous list to a form. Our examples use e-mail to transmit data, but the structure of the form is the same for HTTP protocol transmission.
Use the class os_input_submit
to add a submit button to a form. Selecting a
submit button instructs a form to transmit data on the form. Each submit
button object takes an argument that defines the label to display on the
button icon. If you do not specify an argument, the label is controlled by the
browser and may vary from one browser to the next.
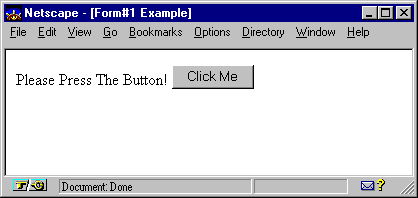
The following example adds a submit button to a form and labels it with the text "Click Me." When the submit button is selected, any information collected on this form is sent in an e-mail message to webtest@recursionsw.com.
Use the class os_input_text
to add a text input field to a form. A text input field is used for entering a
single line of text on a form. When designing a form, keep in mind that the Tab
and Shift-Tab keys move the keyboard focus forward and
backward between fields. Normally, pressing the Enter
key produces no results; however, on a form containing only a text input
field, pressing Enter automatically submits the form.
The following example adds the text input field name to a form. When the submit button is selected, the entered data is sent in an e-mail message to webtest@recursionsw.com.
#include <iostream.h>
#include <ospace/web.h>

int main()
  {
  os_page page( "Form#2 Example" );

  os_form form( "mailto:webtest@recursionsw.com" );

  form << "Please Enter Your Name: "
       << os_input_text( "name" ) << os_break()
       << os_input_submit();
  page << form;
  cout << page;
  return 0;
  }

Use the class os_input_password
to add a password input field to a form. When characters are typed in the
password input field, they are not encrypted but are echoed on the monitor as
asterisks (*).
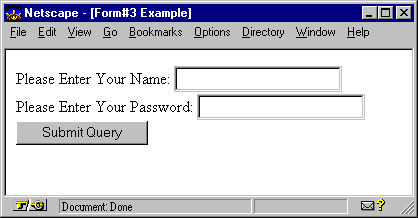
The following example is identical to the previous example, except a password field is also added to the form.
#include <iostream.h>
#include <ospace/web.h>

int main()
  {
  os_page page("Form#3 Example");

  os_form form( "mailto:webtest@recursionsw.com" );

  form << "Please Enter Your Name: "
       << os_input_text( "name" ) << os_break()
       << "Please Enter Your Password: "
       << os_input_password( "password" ) << os_break()
       << os_input_submit();
  page << form;
  cout << page;
  return 0;
  }
Use the class os_textarea
to add a field that will accept multiple lines of text input.
When defining a text area field, you must specify three arguments: the name,
the number of lines permitted, and line length in characters.
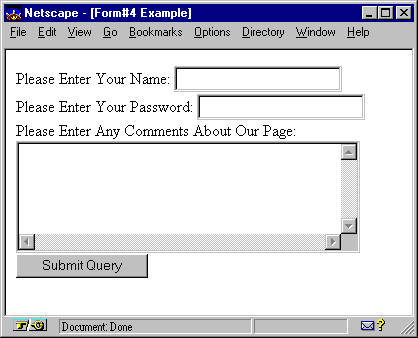
The following example adds the text area field comments to the form. This field permits five lines of text with a maximum of 40 characters of text displayed on each line.
#include <iostream.h>
#include <ospace/web.h>

int main()
  {
  os_page page("Form#4 Example");

  os_form form( "mailto:webtest@recursionsw.com" );

  form << "Please Enter Your Name: "
       << os_input_text( "name" ) << os_break()
       << "Please Enter Your Password: "
       << os_input_password( "password" ) << os_break()
       << "Please Enter Any Comments About Our Page: "
       << os_textarea( "comments", 5, 40 )   // 5 rows, 40 columns
       << os_break()
       << os_input_submit();
  page << form;
  cout << page;
  return 0;
  }
Use radio buttons to declare the possible responses for a selection field when you want to restrict selection to a single choice. Although multiple radio buttons representing different choices can exist for a single selection field, only one can be selected. If you want to provide the ability to select multiple choices, use checkboxes instead. Refer to the Adding Checkboxes section later in this chapter for details.
You can add radio buttons individually or by groups. Both methods are described below.
Use the class os_input_radio
to individually add radio buttons to a form. Each radio button object
contains the following three arguments.
A default selection can be
set using the enumerator os_input_radio::checked
.
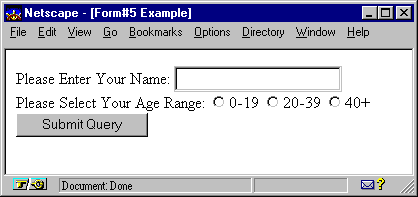
In the example below, three radio button objects are added to a form as possible responses for age range information. All three have the same name assignment, Age, so they represent choices within the same category. Each radio button has a unique value assignment ( young , middle , and old ) to make a unique name/value pair for each radio button. This is the name/value pair sent when the form is submitted. Each radio button also has a unique label (0-19, 20-39, and 40+). A text object with the contents "Please Select Your Age Range" is added before the radio buttons to prompt the user.
#include <iostream.h>
#include <ospace/web.h>

int main()
  {
  os_page page("Form#5 Example");

  os_form form( "mailto:webtest@recursionsw.com" );

  form << "Please Enter Your Name: "
       << os_input_text( "name" ) << os_break()
       << "Please Select Your Age Range: ";
       << os_input_radio( "Age", "young", "0-19" )
       << os_input_radio( "Age", "middle", "20-39" )
       << os_input_radio( "Age", "old", "40+" );
       << os_break()
       << os_input_submit();
  page << form;
  cout << page;
  return 0;
  }
Use the class os_radio_group
, in conjunction with the class os_input_radio
, to define a group of radio buttons. Although the results are the same as
adding individual radio buttons and grouping them with the same name, the
benefits of adding them as a group are:
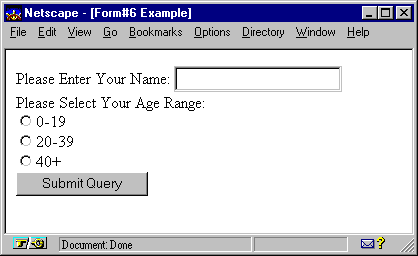
The radio buttons added in the previous example are replaced with the radio button group, rg, in this example resulting in the same choices. However, the radio buttons are positioned vertically.
#include <iostream.h>
#include <ospace/web.h>

int main()
  {
  os_page page( "Form#6 Example" );

  os_form form( "mailto:webtest@recursionsw.com" );

  form << "Please Enter Your Name: "
       << os_input_text( "name" ) << os_break();

  os_radio_group rg( "Age", os_radio_group::vertical,
                     os_input_radio::marker_right );
  rg << os_input_radio( "young", "0-19" )
     << os_input_radio( "middle", "20-39" )
     << os_input_radio( "old", "40+" );

  form << "Please Select Your Age Range: " << os_break()
       << rg
       << os_input_submit();
  page << form;
  cout << page;
  return 0;
  }
Use checkboxes to declare the possible responses for a selection field when you want to permit selection of multiple choices. If you want to restrict selection to a single choice, use radio buttons instead. Refer to the Adding Radio Buttons section in this chapter for details.
You can add checkboxes individually or by groups. Both methods are described below.
Use the class os_input_checkbox
to individually add checkboxes to a form. Each checkbox object contains the
following three arguments.
Default selections can be set
using the enumerator os_input_checkbox::checked
.
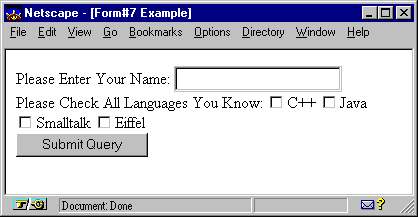
In the example below, four checkbox objects are added to a form as possible responses for language information. All four have the same name assignment, Languages, so they represent choices within the same category. Each checkbox has a unique value definition ( C++ , Java , Smalltalk , and Eiffel ) to make a unique name/value pair for each checkbox. This is the name/value pair sent when the form is submitted. When multiple checkboxes are selected, a name/value pair is sent for each selection. Each checkbox also has a unique label ( C++ , Java , Smalltalk , and Eiffel ). A text object with the contents "Please Check All Languages You Know" is added before the checkboxes to prompt the user.
#include <iostream.h>
#include <ospace/web.h>

int main()
  {
  os_page page("Form#7 Example");

  os_form form( "mailto:webtest@recursionsw.com" );

  form << "Please Enter Your Name: "
       << os_input_text( "name" ) << os_break()
       << "Please Check All Languages You Know: "
       << os_input_checkbox( "Languages", "C++", "C++" )
       << os_input_checkbox( "Languages", "Java", "Java" )
       << os_input_checkbox( "Languages", "Smalltalk", "Smalltalk" )
       << os_input_checkbox( "Languages", "Eiffel", "Eiffel" )
       << os_break()
       << os_input_submit();
  page << form;
  cout << page;
  return 0;
  }
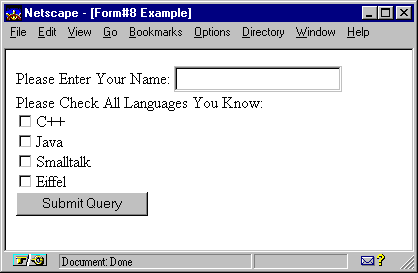
Use os_checkbox_group to define a group of
checkboxes. Although the results are the same as adding individual
checkboxes and grouping them with the same name, the benefits of adding them
as a group are:
The checkboxes added in the previous example are replaced with the checkbox group, cg , in this example resulting in the same choices. However, the checkboxes are positioned vertically.
#include <iostream.h>
#include <ospace/web.h>

int main()
  {
  os_page page( "Form#8 Example" );

  os_form form( "mailto:webtest@recursionsw.com" );

  form << "Please Enter Your Name: "
       << os_input_text( "name" ) << os_break();

  os_checkbox_group cg( "Language", os_checkbox_group::vertical,
                        os_input_checkbox::marker_right );
  cg << os_input_checkbox( "C++", "C++" )
     << os_input_checkbox( "Java", "Java" )
     << os_input_checkbox( "Smalltalk", "Smalltalk" )
     << os_input_checkbox( "Eiffel", "Eiffel" );

  form << "Please Check All Languages You Know: " << os_break()
       << cg
       << os_input_submit();

  page << form;
  cout << page;
  return 0;
  }
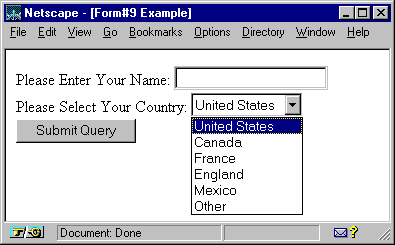
Use the class os_select
to add a selection box to a form. A selection box can be either a pulldown
menu or a scrollbox, and provides the possible responses for input into a
field. Use the class os_option to define each
possible response. Even though multiple responses are defined, only one can be
selected by default.
The following example adds the
select box select with six choices to a form. United
States is specified as the default by os_option::selected
.
#include <iostream.h>
#include <ospace/web.h>

int main()
  {
  os_page page( "Form#9 Example" );

  os_form form( "mailto:webtest@recursionsw.com" );

  form << "Please Enter Your Name: "
       << os_input_text( "name" ) << os_break();

  os_select select( "Country" );
  select << os_option( "United States", os_option::selected )
         << os_option( "Canada" )
         << os_option( "France" )
         << os_option( "England" )
         << os_option( "Mexico" )
         << os_option( "Other" );

  form << "Please Select Your Country: "
       << select
       << os_break()
       << os_input_submit();

  page << form;
  cout << page;
  return 0;
  }
Use the class
os_input_hidden to hide information within a
form. Hidden fields contain information you want transmitted with the form
data but do not want visible on the form. They are useful for transmitting
internal information, and are typically used for maintaining state between
separate CGI program invocations. Each hidden field object takes two
arguments: name and value.
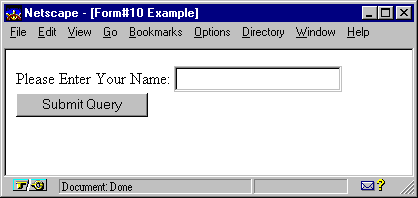
The following example adds a hidden field to the form with a name assignment of memberId and a value of 039458587.
#include <iostream.h>
#include <ospace/web.h>

int main()
  {
  os_page page( "Form#10 Example" );

  os_form form( "mailto:webtest@recursionsw.com" );

  form << "Please Enter Your Name: "
       << os_input_text( "name" ) << os_break()
       << os_input_hidden( "memberId", "039458587" )
       << os_input_submit();

  page << form;
  cout << page;
  return 0;
  }
Use the class os_input_reset
to add a reset button that resets the form's fields to their default values.
Fields without default values are cleared. Each reset button object takes an
argument that defines the label to display on the button icon. If you do not
specify an argument, the label is controlled by the browser and may vary from
one browser to the next.
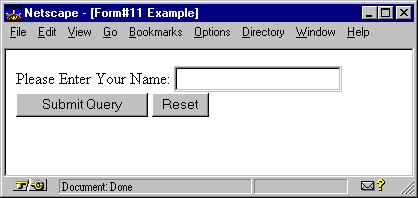
The following example adds a reset button to a form.
#include <iostream.h>
#include <ospace/web.h>

int main()
  {
  os_page page( "Form#11 Example" );

  os_form form( "mailto:webtest@recursionsw.com" );

  form << "Please Enter Your Name: "
       << os_input_text( "name" ) << os_break()
       << os_input_submit()
       << " "
       << os_input_reset();

  page << form;
  cout << page;
  return 0;
  }
Copyright©1994-2026 Recursion
Software LLC
All Rights Reserved - For use by licensed users only.